I have mentioned before how much I LOOOOOOVE creating SMARTboard attendance files. I am super lucky to have a SMARTboard in my classroom. We do not have them in our Kindergarten rooms, so it's my first graders' first experience with one and doing attendance on the SMARTboard in the mornings (aside from the fact that it's SO easy to see right away who's here and not here) gives my kids daily practice with handling this giant new tool right from the get-go. 'Cause the thing with the SMARTboard is that sometimes you have to press sort of hard to make it work, and my little guys typically do not think you are allowed to press that hard on a piece of technology. They need practice to get comfortable moving things around on it, and daily attendance allows for this without the added anxiety of it being an academic activity where they could do something "wrong" and then not want to use the SMARTboard again. Once they get the hang of this (within just a few days), using the SMARTboard for other activities becomes no sweat!
Of course, SMARTboards have a learning curve for teachers, too. I remember when I found out that my SMARTboard was coming (but wasn't in my room yet) and I went to a summer PD class offered by my school district on SMARTboards 101 (I also took 102. Yeah, I was totally a SMARTboard overachiever before I had one, lol). I sat and watched and took copious notes. I even got to try a little bit on the one SMARTboard they had in the classroom for demonstration.
But THEN... a month later when my own SMARTboard arrived in my classroom, I felt like I really had no idea what to do with this new and exciting beast of technology which was plopped right in the middle of my nice big whiteboard space (oh. hmm. Well, that's... ok....don't complain.)
That was a few years ago, and believe you me, there was a learning curve to actually using it in the classroom. Now I feel like I have a pretty good handle on it (although I'm sure it has plenty of cool features I have yet to figure out). I use it a lot, and eventually ventured into making my own SMARTboard attendance to match my classroom owl theme, then others for some of my colleagues' classroom themes, then others by request for TpT or just for fun.
The SMARTboard attendance files available in my store do come with a second slide that gives directions on how to change the names to your own student's names. However, especially with the learning curve of technology, I thought it might be helpful to include a tutorial here with some screenshots in case you find that more helpful. So here we go!
Step 1: Open up your new SMARTboard attendance file in SMART Notebook. If you don't have SMART Notebook software, this file won't work. My files are for SMARTboards only, not other interactive whiteboards. I am going to use my Mod Owl themed attendance file, but the tutorial would work the same with any other SMARTboard attendance file of mine. Here's what it looks like when you open it:
The file comes up in Notebook software. If you look on the left, there are two slides to this file. The first one is the attendance file itself. The second slide is your directions for changing student names. Just click on that slide if you want to see the written directions that come with the file. You can print them out if it helps.
Step 2: SAVE THE FILE ON YOUR COMPUTER.
Yes, I put this in big red letters. You want to save the original file so that you always have this blank, unchanged version. This makes it easy to start over for your next group of kids. Call it something like "SMARTboard attendance Original" or "SMARTboard attendance Template".
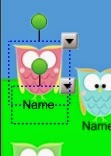
Step 3: Click on one of the owls (or, of course, if you have a different themed file, click on one of the cupcakes or astronauts or sock monkeys... you get the idea). It will look like this with a dashed box around it. The box will include both the owl and the word "Name". Why are they together like that? Because when your student moves her owl, she will want her name to go along with it. Then you will know that she is here!
Step 4: To edit the Name, you will need to separate it from the owl picture. To do this, click on the arrow on the top right of the dashed box:
When you click the arrow, a menu will pop up that looks like this:
Select "Group" and then a smaller menu will pop up. Select "Ungroup".
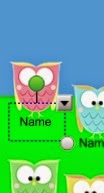
What that does is to separate the owl graphic from the "Name" text box so that they become two separate things, each in its own box. It will look like this:
 |
| See? Two boxes with arrows. |
Step 5: Click somewhere on the screen outside of the boxes (it has to be somewhere on the attendance picture though, like in the sky, etc.). This will make box boxes disappear but the owl and "Name" text are still two separate things. Click on just the "Name" text and a box will appear just around that.
 |
| Good news - this is a text box that you can type in! |
Step 6: Click in the name box (it is a text box) to erase the word name. Type in any name you want.
 |
| It's my name! |
Step 7: Now you want to group the newly added name back together with the owl so that when your student moves her owl, her name will go with it and you will know that she is here. To do this, we are basically going to follow the ungrouping directions above to regroup the graphic and the text box.
Since your text already has the dashed box around it, hold down the shift key and click on the owl. You will see both boxes again like before:
Click on either arrow and, like before, select Group, but THIS time instead of selecting UNgroup in the smaller popup menu, select Group. (So you select Group, Group..)
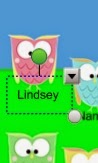
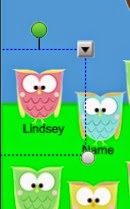
That's it! Now Lindsey's name and owl are once again grouped in one box...
... and they can move together up into the tree!
Step 8: Now you do that for each student that you have in the class (but don't move them into the tree, leave them where they are at the bottom). Yes, it's a little bit time consuming, but it's not hard and after the first one it will go much faster. Click - Ungroup - Edit Name - Group (Done!)
Step 9: BE SURE TO SAVE WITH A DIFFERENT FILE NAME. I don't want to save over my blank template, so once I have all of my student names in, I save under the year (Such as Attendance 2014-15). Anytime you need to edit, go ahead. You can delete whole owls just by clicking on them and then clicking delete. You can add more by copying any owl and pasting it in (or clicking on the arrow at the top of the box and clicking "Clone").
Step 10: IMPORTANT!!! Once your students have moved their owls up in the morning, you can close the file by clicking the red "x" in the top right corner like most programs. It will ask if you want to save the changes you have made. DO NOT SAVE!!! Once my students have moved their owls into the tree, I do not want to save them there for the next day. I want them to be at the bottom again so they can do it again tomorrow. So DO NOT save the changes. Just open your Attendance 2014-15 file again tomorrow and all of your named owls will be waiting at the bottom to start again.
I hope you have found this tutorial helpful. If you would like a new SMARTboard attendance theme, I sell several in my TpT shop (currently 16 when this post is being published) and am happy to make a customized one if you request it to go with your classroom theme. Here is a sample of what I have as of August 2014. Click on either picture to be taken right to the SMARTboard category in my TpT Store:
Have a great school year!!!


This was a really helpful post! Thank you so much for sharing! Teaching Science With Lynda
ReplyDelete